Device Security
This article describes the Gateway V4 Series. Older devices may support some of these features. For details on other devices, please contact us.
Having a large fleet of devices in the field that are connected over the insecure internet comes with risks. Lobaro puts a lot of effort into making our devices secure and preventing them from being compromised. This is a complex topic that includes many different aspects. The devices themselves and the networks they are integrated into need to be set up correctly to achieve a secure setup.
This article describes concepts implemented in Lobaro devices to make them secure and gives an overview of what is needed to set up secure communication between your devices and your backend.
Security at a glance:
- Unique device identity — every device holds its own certificate; the private key is generated on the device and never leaves the secure key storage (→ Device Certificates)
- Encrypted transport — CoAP/DTLS or MQTT/TLS 1.2 with mutual certificate authentication (→ Secure Communication, Supported Cipher Suites)
- Secure broker setup — requirements and recommendations for your server's certificate chain (→ Server Certificates)
- Protected at rest — encrypted configuration storage and passphrase-protected local access (→ Configuration Storage)
- Hardened hardware & boot — Arm TrustZone, KMU, CryptoCell, and signed firmware via MCUboot (→ Device Protection)
Device Certificates
Each Lobaro Gateway V4 device has its own unique device certificate. The Private Key for this certificate is generated from a cryptographically secure random source on the device itself and stored only in the secure Key Management Unit, which is a feature of the Arm Cortex-M33. It is not accessible from the main application, and it never leaves the device. Lobaro does not know those keys and never has access to them during the complete production process nor during the lifetime of the device.
The subject of the device certificate has as common name (CN) the device's unique EUI-641 aka DevEUI, in urn format. The certificate is signed (indirectly) by the Lobaro Device CA. Any intermediate CAs are also included in the device.
During boot, before the main application starts, the device certificate chain (without the root CA) is printed to the log output. It looks like this:
-------------------------------------------------------------------------------
Device certificate chain:
1 CN=urn:dev:mac:70b3d5e050023d3a
1 SHA256=16:55:C7:DF:34:B3:C0:AD:39:32:9A:EF:39:04:43:FA:73:EF:2F:CC:DA:F2:49:7E:86:D4:3A:86:1C:C0:AF:74
1 SHA1=CE:3E:CB:96:14:10:6E:FE:1E:4B:76:DE:F6:A7:2A:1D:E0:5B:7F:F3
2 C=DE, ST=Hamburg, O=Lobaro GmbH, CN=eadrax CA
2 SHA256=58:C4:09:E1:28:85:F2:62:9D:C7:27:1E:BD:EF:AA:F9:DE:87:65:E8:30:D6:02:D9:5F:69:F1:DC:FE:8D:69:A5
2 SHA1=F9:B6:E3:04:6E:8B:D4:0C:A8:28:71:A0:A0:3B:71:FE:C4:02:C9:09
-------------------------------------------------------------------------------
In the example above, a certificate chain of 2 certificates is printed. For each certificate,
the subject and two fingerprints (SHA256 and SHA1) are listed. The certificate numbered 1 is
always the device certificate; it contains the unique EUI-64 of the device, in this case
70-B3-D5-E0-50-02-3D-3A. The certificate numbered 2 is one of Lobaro's intermediate CAs,
that was used to sign the device certificate. That certificate is signed by the
Lobaro Device CA.
On a TLS or DTLS handshake, all certificates in this list will be presented.
It is possible to extract the complete certificate from the device using the Lobaro Config Tool. You can also install your own certificate, signed by your own CA over the Config Tool, if you prefer.
The certificate management UI requires Lobaro Maintenance Tool v2.20.2 or later.
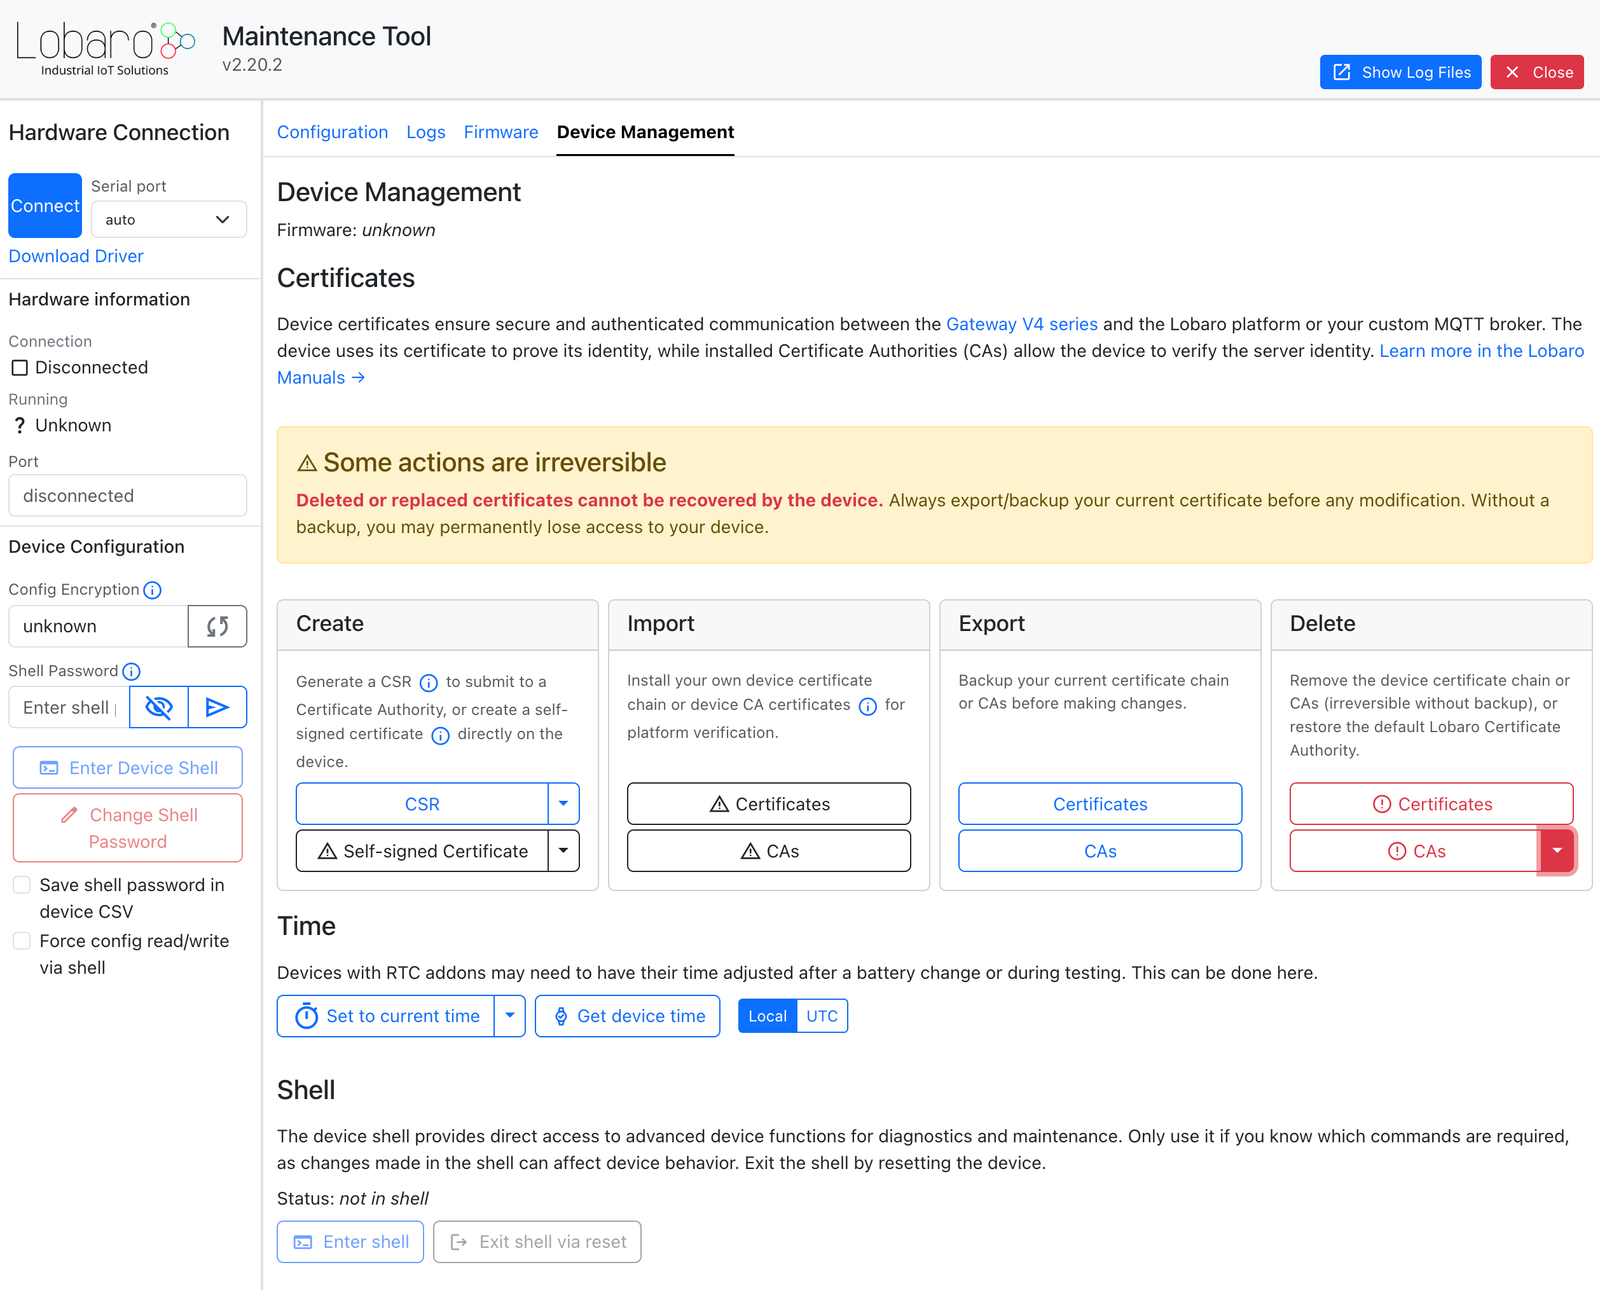
Custom Certificate Management (shell commands)
The following shell commands are available for advanced certificate management, e.g. during provisioning with a custom CA. Commands are entered via the Lobaro Config Tool shell.
Self-signed certificate:
cert self-signed <subject>
Creates a self-signed certificate. The CN is automatically set from the DevEUI in URN form (e.g.
urn:dev:mac:70b3d5e05001c6f3). Additional subject fields are appended, e.g.:
cert self-signed C=DE,O=Lobaro,L=Hamburg
Self-signed certificates require the broker to know each individual device certificate or fingerprint. Using a common CA is strongly preferred for production.
Certificate Signing Request (CSR):
cert csr <subject>
Generates a CSR (same syntax as self-signed). The CSR is printed to the console and must be signed externally by an
intermediate CA that chains up to the Lobaro Device CA (or your own CA).
A development CA for testing is available at github.com/lobaro/development-certificates.
Write signed certificate to device:
cert own
Multi-line input (PEM format). Paste the device certificate followed immediately by the intermediate CA certificate.
Send an empty line to confirm, exit to cancel. Maximum combined size for certificate chain + trusted CAs: ~4 kiB (DER
format).
Write trusted CA certificates:
cert ca
Same input handling as cert own. Accepts a list of trusted server CA certificates (or individual server certificates).
Certificate Revocation: Not supported by the device.
Lobaro Device CA
The Lobaro Device CA is a self-signed certificate with this information:
Subject: CN = Lobaro Device CA, C = DE, ST = Hamburg, O = Lobaro GmbH
SHA256 Fingerprint = 1E:BF:5E:9A:B5:EB:47:23:B0:4E:1E:00:74:E5:19:FD:B0:29:3C:FA:06:7C:7B:78:BF:95:A0:D7:66:D3:CF:26
SHA1 Fingerprint = 70:5A:96:F6:2B:BF:CC:19:EF:57:87:C6:62:A4:C0:3B:84:35:2E:70
You can download the Lobaro Device CA here.
Secure Communication
Lobaro devices support multiple ways to communicate with backend servers. There is a proprietary CoAP protocol, that is used to communicate with the Lobaro IoT Platform. Alternatively MQTT is used for communication with third-party platforms. Both can be used with or without a TLS/DTLS security layer2.
Lobaro highly recommends using secure communication! You can define whether to use TLS/DTLS or not
when you specify the protocol in your host parameter. coaps and mqtts as protocols activate the
use of the secure layer (just like https does for HTTP in your browser). So the correct value for your
host configuration parameter would be coaps://platform.lobaro.com for your device to communicate
securely with the Lobaro IoT Platform.
Lobaro IoT Platform
The preferred way to connect your devices to the Lobaro IoT Platform is using the CoAP protocol and DTLS, so
setting the host to coaps://platform.lobaro.com is the norm. If you are using a dedicated instance of the
Lobaro IoT Platform, the host will be different, but the protocol should still be coaps.
It is possible to connect to the Platform using plain CoAP without DTLS. To do this, you must explicitly allow unencrypted, unauthenticated communication in the device's security settings. This is not recommended. If you enable this insecure communication, anyone who knows the device's EUI-64 will be able to impersonate it! With DTLS enforced, only connections from the device itself will be accepted to send data for this EUI-64, because the device is the only place that holds the private key.
The Platform stores the certificate of each device. You can check the certificate's fingerprint in the Security tab of the device in the Platform. Only secure connections using this exact certificate will be allowed to send uplinks (and receive downlinks) for this device. During manufacturing, the certificate generated on the device is uploaded to the Platform and assigned to that device.
The Platform does not do any validation of the certificate chain; only the device certificate (listed as
number 1 during boot). This allows the usage of custom CAs in your devices for connecting the Platform,
or even self-signed device certificates, without sacrificing security – as long as you verify that
the correct certificate is stored in the Platform for the device.
MQTT Communication
When you are not using the Lobaro IoT Platform as a backend, you are most likely using MQTT to connect your devices to your own backend3. Plain MQTT (without TLS) is supported, but not recommended, as it sends credentials unencrypted over the network and allows reading your communication and impersonating your devices.
When the device connects to an MQTT broker using TLS, it presents its certificate during the handshake.
The broker will most likely deny the connection, unless you add the Lobaro Device CA
to the list of trusted CAs in your broker. If you cannot add the certificate, but can set your broker to
allow connections without a certificate, it is possible to stop the device from sending its certificate,
by adding ?cert=0 to the host parameter. Again, this is not recommended.
Authentication using MQTT
It is possible to have certificate-based, password-free, per-device authentication on your MQTT broker. This happens when you connect to the Lobaro IoT Platform using MQTT with TLS. Similar to the handling of CoAP connections, the device is identified by its individual certificate during the handshake. Our broker only allows access to the topics that are explicitly used for this device (with its EUI-64 in the topic name). This allows easy and secure configuration of your devices without the need for any usernames or passwords. The strict separation isolates devices from each other and prevents access to your data by other customers using the same platform.
It is possible to replicate this behaviour in your own MQTT broker, but it will need work both when setting up the server and when managing your device fleet. There needs to be a database that stores the certificates per device and allows restricted access to each client depending on the certificate it presents.
There are simpler approaches with varying levels of security. A simple and solid solution would be to set
up a dedicated MQTT broker for your devices and your backend, that only trusts the Lobaro Device CA and
the certificate used by your backend. This way you can use an out-of-the-box MQTT broker with minimal
adjustment on the TLS configuration. You would need no adjustment on the devices, besides setting the host
parameter to your server, using something like mqtts://your.server.example.com4. You will
have a secure setup, where your backend can trust incoming messages and know from the topic alone, which
device sent the message – with certainty. With this setup, devices are theoretically able to see each other's
messages and impersonate each other, but Lobaro devices do not do that.
Alternatively it is possible to authenticate devices using username and password. You can add them to
the host parameter as you would in an HTTP URL: mqtts://<username>:<password>@your.server.example.com5.
If you are using a password based authentication approach, you must make sure to use strong, long enough passwords
from a secure random source. You should use individual users and passwords for your devices, so that no two
devices share their credentials. Credentials are stored encrypted on the devices and are not accessible if
the device is locked with a device passphrase. They are, however, uploaded to your backend on the first
connection, when the current configuration is uploaded. If access to MQTT-topics is not limited on your
broker, credentials of a single device can be used to sniff the credentials of all other devices. If you are
using MQTT without TLS, credentials are sent in plain text over the internet and can easily be sniffed by
an adversary.
Using password based authentication causes a lot of overhead and comes with some security pitfalls. We recommend using a certificate based authentication approach.
Securing MQTT topics
Lobaro's Gateway V4 Series devices use multiple MQTT topics for different purposes. They all include the
device's EUI-64 (the main address) in the name.
The device with the EUI-64 70b3d5e050023d3a will subscribe to LOB/70b3d5e050023d3a/down/#
and publish to LOB/70b3d5e050023d3a/up/+, and LOB/70b3d5e050023d3a/req/+ (the prefix LOB/ can be
adjusted if needed).
For a secure setup you must configure your broker in a way, that grants each device only publishing access
to its own up and req topics, and only to subscribing to its own down topics. Access to all other topics,
including topics with different EUI-64 should be denied. Your backend should be the only client with read
access on the up and req topics, and write access on the down topics. This isolation limits damage that
is caused, when the credentials of a single device are compromised.
Server Certificates
Using MQTT with TLS requires that the broker presents a valid certificate chain during the handshake.
Regardless of firmware version, we generally recommend ECDSA certificates over RSA for the broker and its chain. Elliptic curve keys are much smaller and their operations are cheaper, which means smaller handshakes, less data usage, and lower energy consumption — see Certificate Size, Energy and Data Usage. They also avoid all the RSA limitations of older firmware described below.
Firmware versions up to v0.13.x have hard limitations on the supported certificate algorithms.
If any certificate in the chain uses RSA with a key size larger than 2048 bits, a SHA384 or SHA512
signature, or an ECDSA P-384 key, the handshake will fail. Firmware version v0.14.0 and newer
support RSA up to 4096 bits, SHA384/SHA512 signatures, and ECDSA P-384.
For a broker setup with a public CA, see
How to set up Mosquitto with a Let's Encrypt certificate
(requires firmware v0.14.0 or newer). If you need to set up a broker for devices with older firmware, you can use a
self-signed certificate — see How to set up Mosquitto with a self-signed certificate.
On firmware versions up to v0.13.x, any certificate using RSA-4096, SHA384/SHA512, or ECDSA P-384 will cause the
handshake to fail.
This limit applies to every certificate the server sends during the handshake — leaf, intermediates, and any additional cross-signed or root certificates that are transmitted but not strictly required for validation. A single certificate with a larger RSA key (e.g. RSA-4096, as used in some Azure and cross-root setups) anywhere in the chain aborts the handshake.
The trusted CA installed on the device is subject to the same limit.
Certificates created by Let's Encrypt are affected — see Using Let's Encrypt.
If you run into this problem, updating the firmware to v0.14.0 or newer is the recommended fix — it removes
these limitations entirely. You can find the firmware download in the Firmware Updates section of your product's
page (e.g. Gateway V4), and update instructions in the
Firmware Update Guide.
To check the key sizes of your own broker's certificate chain, see Troubleshooting TLS Handshakes.
Certificate Size, Energy and Data Usage
Beyond compatibility with older firmware, the choice of key type matters because Lobaro Gateway V4 devices are typically battery-powered and communicate over cellular (LTE-M / NB-IoT) networks. The server presents its full certificate chain on every TLS/DTLS handshake, so a larger key means more bytes transmitted — which translates directly into higher energy consumption and more data usage on every reconnect.
Elliptic curve keys are dramatically smaller than RSA keys at an equivalent (or higher) security level. The
CryptoCell hardware accelerates ECDSA as well as RSA up to 2048 bit. Larger RSA keys (supported since firmware
v0.14.0) have no hardware support and are handled in software — using additional memory, time, and power.
Rough sizes of the raw public keys:
| Type | Security level | Public key |
|---|---|---|
| RSA 2048 | ~112 bit | ~270 byte |
| RSA 4096 | ~140 bit | ~520 byte |
| ECDSA P-256 | ~128 bit | ~65 byte (uncompressed) / ~33 byte (compressed) |
| ECDSA P-384 | ~192 bit | ~97 byte / ~49 byte |
An RSA-4096 certificate adds roughly half a kilobyte per certificate to the handshake compared to a few dozen
bytes for an elliptic curve key. For a fleet of battery devices that reconnect regularly, this is the reason we
recommend ECDSA P-256 certificates on the broker — it is the most efficient option and also the only one that
works with firmware versions up to v0.13.x (which support neither RSA keys larger than 2048 bit nor the P-384
curve). ECDSA P-384 is a good alternative for devices on firmware v0.14.0 or newer.
Supported Cipher Suites
A TLS 1.2 cipher suite name describes the algorithms used for the connection itself. Taking
TLS_ECDHE_ECDSA_WITH_CHACHA20_POLY1305_SHA256 as an example:
ECDHE— the key exchange: ephemeral Elliptic Curve Diffie-Hellman, which negotiates a fresh session key for every connection (forward secrecy).ECDSA(orRSA) — the authentication: the type of public key in the server's certificate. An_ECDSA_suite is only negotiated if the server certificate holds an EC key, an_RSA_suite only for an RSA key.CHACHA20_POLY1305(orAES_128_GCM/AES_128_CCM/AES_128_CBC) — the bulk encryption: the symmetric cipher that encrypts and authenticates the application data.SHA256— the handshake hash: used in the key derivation (PRF) and handshake integrity, not for certificate signatures.
All supported cipher suites are executed in the Arm CryptoCell 310 crypto hardware (see Arm Cortex-M33). Offloading the session cryptography to dedicated hardware is fast and keeps the energy cost of every secured communication low — important for battery-powered devices.
Cipher suites vs. certificate signatures — don't confuse them
Do not confuse the cipher suite with the signature algorithms of the certificates in the server's chain
(e.g. sha384WithRSAEncryption or ecdsa-with-SHA384). These are independent: the SHA256 in the cipher suite
name only refers to the handshake hash. A certificate chain signed with SHA384/SHA512 (supported since v0.14.0,
see Server Certificates) is validated just fine over a connection that negotiates a
..._SHA256 cipher suite. That is why no SHA384 cipher suites appear in the lists below.
v0.14.0 and newer
Starting with version 0.14.0, the origin firmware supports the following TLS/DTLS cipher suites:
TLS_ECDHE_ECDSA_WITH_CHACHA20_POLY1305_SHA256TLS_ECDHE_ECDSA_WITH_AES_128_GCM_SHA256TLS_ECDHE_ECDSA_WITH_AES_128_CCMTLS_ECDHE_RSA_WITH_CHACHA20_POLY1305_SHA256TLS_ECDHE_RSA_WITH_AES_128_GCM_SHA256
v0.13.x and older
Older firmware versions (up to v0.13.x) support the following TLS/DTLS cipher suites:
TLS_ECDHE_ECDSA_WITH_AES_128_GCM_SHA256TLS_ECDHE_ECDSA_WITH_AES_128_CBC_SHA256TLS_ECDHE_ECDSA_WITH_AES_128_CBC_SHATLS_ECDHE_ECDSA_WITH_AES_128_CCMTLS_ECDHE_RSA_WITH_AES_128_GCM_SHA256
Configuration Storage
Lobaro devices have a lot of configuration parameters. Some of these contain sensitive information, including LoRaWAN keys, APN credentials, SIM Pins, MQTT credentials, and more. All this information must be stored on the device and be accessible for the device to use it. At the same time, this information must be protected from unauthorized access. The configuration is stored in a dedicated part of the device's flash memory.
Starting with Version 0.10.0 of the origin firmware (which is the basis for the Gateway V4 Series), the
configuration is encrypted and authenticated using AES-GCM. The key used for this encryption is
stored in the secure Key Management Unit (KMU) of the Arm Cortex-M33. It is inaccessible by the firmware
and cannot be extracted, even by Lobaro. The configuration values are not printed in the log output during normal
operation (they are, however, uploaded to the backend, when using CoAP or MQTT communication; when using
TLS/DTLS and with a correctly set up backend, this is not an issue, as you know those values and need them
for device management).
The device configuration is stored encrypted (see Configuration Storage). Encrypted configuration storage was introduced in firmware version 0.10.0.
Firmware versions older than 0.10.0 (e.g. 0.9.x or earlier) cannot read the encrypted configuration. Downgrading a device to such a version discards the stored configuration (including LoRaWAN keys, APN credentials, SIM PINs, and MQTT credentials), and the device reverts to its defaults.
Before downgrading, back up all configuration values and be prepared to set the device up from scratch.
Local access to the configuration (reading and writing values) is done over the Lobaro Config Tool. For your config values to be protected, you need to set a device password that limits access to it.
Lobaro Config Tool
The Lobaro Config Tool is a program (available for Windows, Linux, macOS, and Raspberry Pi), that allows diagnostic access and configuration of the device over a physical connection via the Lobaro USB Config Adapter. With the Config Tool you can:
- Examine the log output during operation, to diagnose problems and misconfigurations.
- Read and write the device's configuration.
- Install firmware updates on the device (only firmware signed by Lobaro will be executed by the device).
- Examine the complete device certificate chain (without the root CA), and the trusted CA.
- Install a custom certificate (self-signed or via CSR) and trusted CA.
- Change the device's passphrase.
Access to the configuration and certificate management is protected by a unique passphrase per device. Lobaro will provide you with the passphrase on purchase. You can change the passphrase, if you want. If you do, you must use a strong passphrase from a good random source. You must use an individual passphrase for each device. Your device fleet will not be secure, if you ignore this.
Make sure to keep the passphrase safe and do not lose it! There is no recovery process and no master password.
Device Protection
Arm Cortex-M33
The core component of the Lobaro Gateway V4 Series devices is the nRF91 family by Nordic Semiconductor (nRF9160 in older hardware variants, nRF9151 in newer ones). It is based on the Arm Cortex-M33 architecture, which provides a bundle of features meant to protect the finished product from unauthorised access and provide the tools needed for secure operations. Features include:
- The Arm TrustZone – a hardware-based security technology, that isolates critical code and hardware components from the main application. If there are any vulnerabilities in the main application, they cannot be used to access those critical components, which include session keys used for secure communication and access to other sensitive information.
- The Key Management Unit (KMU) – a secure storage for cryptographic keys, that can only be used from the secure world of the Arm TrustZone. Keys can be stored so that they cannot be extracted by the software, but still be used for cryptographic operations.
- The Arm CryptoCell 310 – a hardware-based cryptographic processor that executes cryptographic operations in a secure environment, providing resistance against side-channel attacks. It acts as a source for cryptographically secure random numbers.
- Access protection for the flash and memory, that can protect areas or the complete chip from being read from or written to. It can protect the flash from being altered by the firmware itself, so that the most critical parts of the firmware cannot be altered.
Device Identity
The device has multiple unique keys that are generated in the CryptoCell during manufacturing and stored only inside the secure KMU and cannot be extracted. Lobaro does not have access to these keys, and neither do you, as the device's owner. This includes the secret asymmetric key used for the device certificate. If an adversary succeeds in resetting the Arm Cortex to its factory state, these keys will be destroyed in the process.
As long as the device is using its original certificate for communication, you can be confident, that the device is not compromised.
Signed Firmware
The first stage bootloader of the device uses MCUboot. That is a well established secure bootloader that we use to verify the integrity and authenticity of the installed firmware, before it is executed.
Our firmware images are signed with a private key. Only if the firmware is intact and the signature is valid is it executed. If only a single bit has been altered, MCUboot will detect the manipulation and refuse to start the firmware. So if an adversary succeeds in installing a manipulated firmware, either through remote firmware update or by physical access, the device will not execute it.
Troubleshooting TLS Handshakes
Secure_TlsHandshake failed with 3b00
If the device log shows:
NW| Secure_TlsHandshake failed with 3b00
NW| failed to connect security layer
the device could not parse an RSA public key from the server's certificate chain. On firmware versions up to v0.13.x,
this is almost always caused by an RSA key larger than 2048 bit somewhere in the chain the server sends (see
the certificate limits) — including cross-signed or root certificates that are sent but not
required for validation.
Firmware v0.14.0 and newer support RSA up to 4096 bits, SHA384/SHA512 signatures, and ECDSA P-384, so this error
no longer occurs with such chains. Updating the firmware is the recommended fix — find the download in the
Firmware Updates section of your product's page (e.g. Gateway V4). The
steps below help if you need to keep devices on older firmware and adjust the server instead.
To find the offending certificate, you need two openssl commands: one to download the certificate chain from the
server, and one to inspect each certificate's key size.
1. Download the chain the server sends:
openssl s_client -connect <host>:<port> -showcerts
2. Check the public-key algorithm and size of each certificate:
openssl x509 -noout -text -in <cert>.pem | grep -A1 "Public Key"
What these commands do (and how to get openssl)
Both commands come from OpenSSL, a widely used command-line tool for inspecting TLS connections and certificates:
-
openssl s_client -connect <host>:<port> -showcertsopens a TLS connection to the broker (e.g.broker.example.com:8883) and prints the full certificate chain exactly as the server sends it — leaf certificate first, then every intermediate and any extra root/cross-signed certificate. It does not tell you the key sizes; it just shows you which certificates are involved. This is the important part: the device sees the same chain, and any oversized RSA key in it breaks the handshake — even certificates that are not strictly needed for validation. -
openssl x509 -noout -texttakes a single certificate (in PEM format) and prints its human-readable details, including the line you care about, e.g.Public-Key: (4096 bit)and the algorithm (rsaEncryptionvs. an EC curve likeid-ecPublicKey/prime256v1).-nooutsuppresses the raw certificate output,grep -A1 "Public Key"filters down to just the relevant line.
So you first use s_client to get the certificates, then run x509 on each one to find the certificate whose RSA key
exceeds 2048 bit. The example below combines both into a single command.
Where to get openssl:
- Linux / macOS: OpenSSL is normally pre-installed — just open a terminal and run the commands. On macOS you can
otherwise install it via Homebrew (
brew install openssl). - Windows: OpenSSL is not included by default. The easiest options are the built-in Windows Subsystem for
Linux (WSL) or Git Bash (part of Git for Windows, which ships with
openssl). Alternatively, download a Windows build from the OpenSSL Wiki – Binaries.
More about OpenSSL: openssl.org.
To fix it on the server side instead — for devices that stay on firmware v0.13.x or older — use an ECDSA P-256
server certificate with an ECDSA chain (recommended anyway), or ensure
every certificate in the chain uses RSA ≤ 2048 bit. Also avoid sending unnecessary cross-signed root certificates;
only the leaf plus the required intermediates need to be presented.
Note that a self-signed certificate on the broker is sufficient for the device — it does not require a certificate from a public CA. If you install a self-signed ECDSA certificate and add it (or the Lobaro Device CA setup) to the broker's trust configuration, you avoid public-CA chains entirely.
Example: print a server's chain with key sizes
Ready-to-use command and example output
This one-liner connects to a broker (here the Lobaro Platform on the MQTTS port 8883), splits the presented chain into
individual certificates and prints each certificate's subject and public-key size:
openssl s_client -connect platform.lobaro.com:8883 -showcerts </dev/null 2>/dev/null \
  | awk '/-----BEGIN CERTIFICATE-----/{c++} c{print > ("cert" c ".pem")} /-----END CERTIFICATE-----/{c2=1}' \
  && for f in cert*.pem; do \
       echo "== $f =="; \
       openssl x509 -noout -subject -in "$f"; \
       openssl x509 -noout -text -in "$f" | grep -E "Public Key Algorithm|Public-Key:"; \
     done
The port is mandatory — openssl s_client -connect <host> fails with no port defined if you omit it (MQTTS is usually
8883).
Example output for platform.lobaro.com:8883 — a healthy chain, one leaf certificate with a 256-bit EC key:
== cert1.pem ==
subject=C = DE, ST = Hamburg, O = Lobaro GmbH, CN = platform.lobaro.com
            Public Key Algorithm: id-ecPublicKey
                Public-Key: (256 bit)
Here every certificate reports 256 bit (EC) — the device can handle this. If any line instead showed something like
Public-Key: (4096 bit) with rsaEncryption, that certificate would be the cause of the 3b00 error on firmware up
to v0.13.x. The generated cert*.pem files are written to the current directory; delete them afterwards.
Using Let's Encrypt
Using Let's Encrypt certificates requires app-nrf91-origin v0.14.0
and app-nrf91-secure v0.5.0 or newer. Older firmware versions cannot validate Let's Encrypt chains: the
cross-signed ISRG Root X1 is RSA-4096, and the ECDSA alternative ISRG Root X2 uses P-384, which is not
supported before v0.14.0 either.
With current firmware, Let's Encrypt works without special precautions. We still recommend requesting an ECDSA certificate and serving the ECDSA chain (ISRG Root X2) — it keeps the handshake small, which saves energy and data on battery-powered cellular devices (see Certificate Size, Energy and Data Usage).
For a complete walkthrough, see How to set up Mosquitto with a Let's Encrypt certificate.